

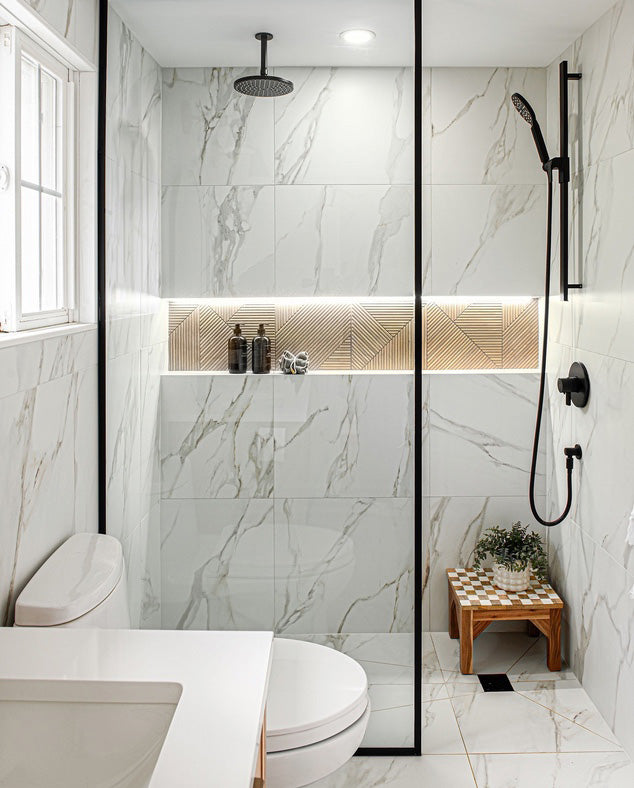
You’ve seen the photos on Pinterest: a luxurious, spa-like bathroom with a perfectly illuminated shower niche, casting a warm glow on expensive bottles of shampoo. It looks high-end, professionally designed, and incredibly difficult to do.
But here’s the secret: It’s not that hard. The hardest part is running the wire so you never see it.
If you are remodeling your bathroom and want to add that designer touch, you need to plan your wiring before the first tile goes up. In this guide, I’m going to show you the cleanest way to feed low-voltage wire through the corner of your shower niche for a professional, hidden finish.
Why Niche Lighting is a Game Changer
Before we get to the "how," let's talk about the "why." Standard overhead shower lights are utilitarian. They’re functional, but they don't create an ambiance.
Adding LED lighting inside the niche accomplishes three things:
-
Aesthetics: It turns a simple storage spot into a design feature.
-
Functionality: It makes it easier to see what you’re reaching for without turning on blinding overhead lights during a late-night shower.
-
Value: It’s a low-cost upgrade that adds massive perceived value to your remodel.
The Key to Success: Planning and "Rough-In"
This is not a project you can decide to do after your shower is tiled. You must "rough-in" the wiring during the framing or backer board stage.
What is Rough-In?
Rough-in means running your low-voltage cable from your power source (which will be located in a dry area like a vanity cabinet or closet) to the actual location of the shower niche. This is done while the walls are open.
Tools and Materials You’ll Need
-
Waterproof LED Strip Kit: Do not use standard LED strips. Look for silicon encapsulated LED strip
-
Low-Voltage Wire: 18 AWG or 16 AWG 2-conductor wire is standard for Class 2 low-voltage systems.
-
Drill and Tile Drill Bits: (If drilling through a pre-fabricated niche or tile).
-
100% Silicone Sealant: Crucial for waterproofing.
-
Heat Shrink Tubing: For sealing wire connections.
-
LED Driver (Transformer): This converts your home’s 120V power to 12V or 24V DC.
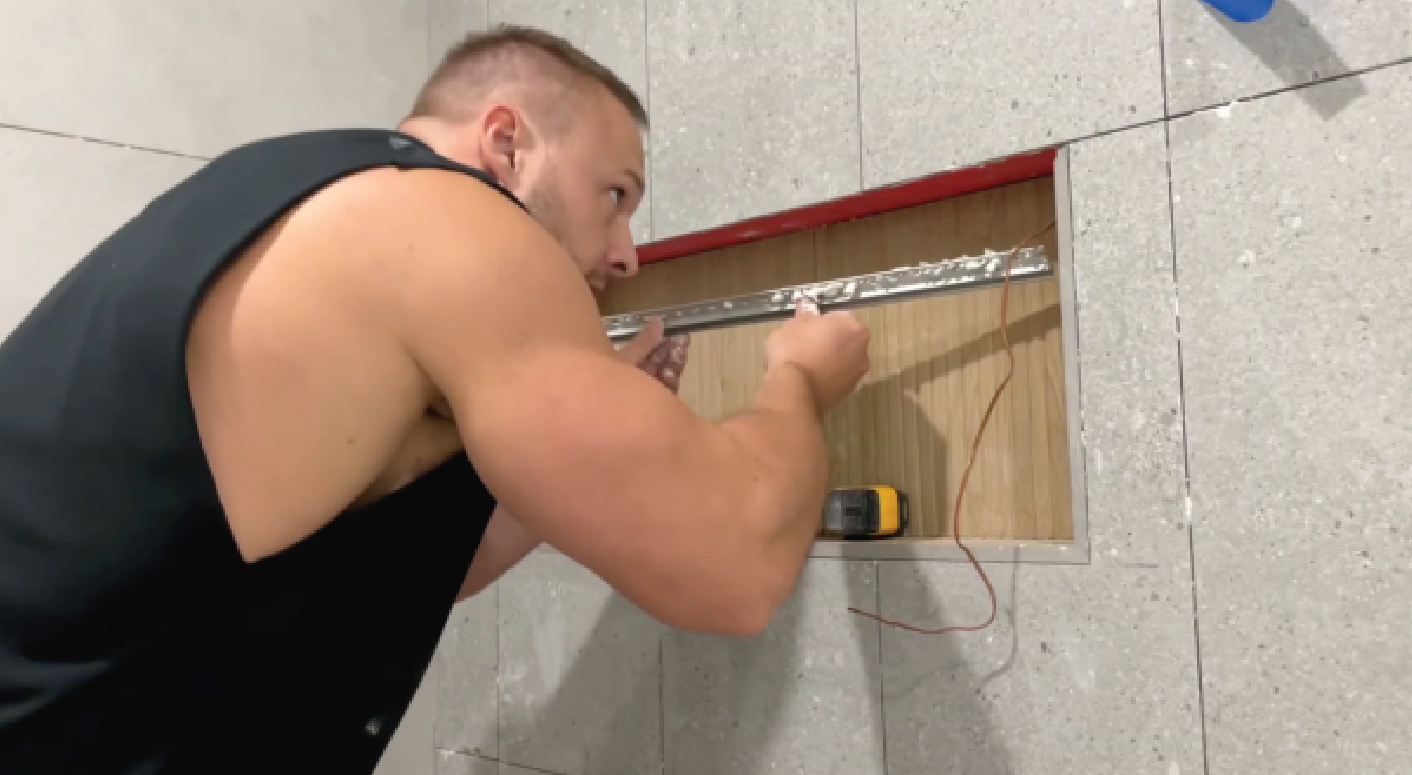
Step-by-Step Guide: The "Hidden Corner" Feed
This method ensures the wire enters the niche at its least visible point: the very back corner. When tiled, the strip itself remains hidden under the niche lip, and the wire entry point is completely obscured.
Step 1: Locate the Power Source
Your LED driver cannot be buried behind the wall. Plan a location for it in a dry, accessible area (like under a sink or in a nearby closet). Run your low-voltage wire from this location through the framing and up to the niche area.
Step 2: Mark Your Entry Point
If you are using a prefabricated niche (like Schluter-Kerdi or Wedi), you need to decide where the light strip will be mounted. Most people mount it along the top "ceiling" of the niche against the back wall
Mark your wire entry point in the top-back corner of the niche. This allows the wire to enter exactly where the LED strip begins its run.
Step 3: Drill the Penetration
Using a drill bit slightly larger than your wire, carefully drill through your backer board or pre-fab niche at your marked entry point. Angle the drill slightly downward (towards the shower floor) to create a naturally shedding angle for moisture.
Step 4: Feed the Wire through the Corner
Feed your low-voltage wire through the hole from the back (framing side) until several inches are sticking into the niche.
Step 5: Create a Slack Loop (Drip Loop)
Before you secure the wire on the framing side, create a small downward loop in the wire behind the backer board. This is called a drip loop. If moisture ever migrates along the wire behind the wall, the loop forces it to drip off the wire onto the bottom framing, rather than following the wire directly into your connection points.
Step 6: Waterproofing (The Most Crucial Step)
You cannot skip this. Water will find this hole if it is not sealed.
From inside the niche, apply a generous amount of 100% silicone sealant into and around the hole where the wire enters. Use your finger to tool the silicone, ensuring it creates a smooth, watertight bond between the wire jacket and the niche material.
What’s Next? (The Final Touches)
Once your wire is fed and waterproofed, you are ready for the next stages of your remodel:
-
Waterproofing the Walls: Apply your shower waterproofing membrane (liquid or sheet) over the walls and niche, ensuring you membrane right up to the silicone seal you just created.
-
Tiling: Tile the shower as normal. The wire will remain loose inside the niche cavity until the tile is set.
-
Final Hookup: Once the tile is set and grouted, you will cut your LED strip to length, solder or connect it to your wire, apply heat shrink to the connection, and adhere the strip inside the top lip of the niche.
Have You Tried This?
Running niche lighting is a small step that makes a huge impact. Are you using a pre-fab niche or building a custom one for your remodel? Let me know in the comments!
Leave a comment
All comments are moderated before being published.
This site is protected by hCaptcha and the hCaptcha Privacy Policy and Terms of Service apply.